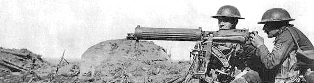
Shooting the Semi-Automatic Vickers
This section is not intended to be the "end-all" Vickers guide. It is intended as an overview for the beginning collector who like me strives to shoot "safely." If you can find one, I suggest a copy of Dolf Goldsmith's book "The Grand Old Lady of No Mans Land." Dolf's books contains a wealth of information for both the collector and shooter. Unfortunately, the book is out of print and copies sell for several hundred dollars. Fortunately, most of the manuals can be found online. I recommend the following:

Right click on the image
to download the PDF
version (4.4MB)
Other manuals can be found at: http://www.vickersmachinegun.org.uk/manual.htm.
Head Space
This discussion pretains to the .303 British (7.7mmx56R) cartridge. Since the .303 Vickers fires a rimmed cartridge the headspace measurement is taken from the face of the breech block to face of the chamber or the maximum allowed space between the breech block and the face of the chamber. Looking at the rear of the barrel, you will find two grooves in the breech block that the extractor fits into. The grooves prevent the extractor from making contact with the barrel; if the extractor were to make contact it would likely break. The top and bottom of the case rim not captured by the extractor seats against the breach block area and determines the headspace.
A standard Field or NO-GO gauge will not fit into the extractor slot. Therefore, headspace with a GO gauge to feel for the check just prior to the crank handle contacting the check lever. A .005 feeler gauge should slip into the gap between the handle and check lever. If it makes hard contact, with correct headspace, the check lever should have a little metal removed until you get the .005-.004 space. If not, you'll beat the check lever rivets right out of the sideplate. The following instructions from a British Annourer's manual describe how to test and adjust the headspace adjustment:
1. Remove the fusee spring.
2. Raise the rear cover and put the crank handle onto the roller.
3. Insert on the face of the extractor, opposite to the firing pin hole, an armourer's dummy (headspace gauge).
4. lift the extractor up to its highest point.
5. See that the barrel is fully forward.
6. Turn the crank handle towards the check lever.
7. Guide the armourer 's dummy into the chamber.
8. Push the check lever back just clear of the crank handle, and let the crank handle gently down towards it.
9. If the connecting rod is of correct length, a check will be felt just before the crank handle reaches the check lever. If no check is felt, the lock is not fully home and the connecting rod is too short.
Adjusting the length of the connecting rod
1. Remove the fusee spring.
2. Take out the lock.
3. Determine the number of No 1 or of No 2 washers (or both) required to correct the length of the connecting rod, by first placing a No 1 on the outer face of the adjusting nut on the connecting rod, replacing the lock and re-testing the length, adding washers and again re-testing. When the rod's length has been determined, the washers which have been placed on the outer face of the adjusting nut must be assembled permanently on the shoulder of the connecting rod and secured by the nut. To do this, turn the connecting rod back, unscrew the adjusting nut with the combination tool and remove it. Place the washers on the connecting rod and screw the adjusting nut tightly home onto the washers. Retest to ensure that the adjustment is correct
Two sizes of washers, .003- and .005-in, are issued. The No 1, .003-in washer has one hole punched in the rim and the No 2, .005-in washer has two holes in the rim. By the use of these sizes in combination, adjustments to 3, 5, 6, 8, 9, and 10 thousandths of an inch can be made.
Packing
The barrel groove and muzzle gland packing must be tight enough to prevent leakage, but if too much string is wound around the muzzle and the gland is screwed down tightly, the barrel will not be able to move. To rectify this, loosen the gland until the recoiling parts can move, then gradually tighten. If it cannot, after a few turns, be screwed down without clamping the barrel, remove some of the packing material. There should be some resistance on the last few turns when tightening the gland, otherwise there will not be a good seal.
To pack the barrel groove, packing string similar to the old type water pump packing is most commonly used, but modern PVC pump packing and even rubber "O" rings of suitable size can be used. The old type string should be lubricated, then wound around the barrel groove two or three times. The more material that can be inserted in this groove and still allow the barrel to reciprocate the better, as the seal will be improved and water will not leak out
A "rule of thumb" indicated that a length of British issue string of twice the circumference of the water jacket should be used for the front packing, and a length of 1 1/2 times the length of the water jacket should be used for the rear cannelure. Note the string must be lubricated so the barrel will slide, the rear cannelure packing must be oiled after inserting it, and then tapped down so the groove is completely filled.
Adjusting the Fusee Tension
For those that have built a Vickers here are two critical pieces of knowhow. Weighing and Adjusting the Fusee Spring. With the spring balance, proceed as follows:
1. Take out the lock, place the loop of the spring balance over the knob of the crank handle, and, standing on the left side of the gun, press down the check lever with the left hand.
2. Pull the balance vertically upwards, resting the wrist on the breech casing; the reading indicated, when the crankhandle begins to move will be the weight of the fusee spring. This weight should be between 7 and 9 lbs.
3. In accordance with the official instructions the cover of the gun is open and the lock has been removed. Use a steady two-handed grip on the scale, which should be done slowly so that at the exact moment the crank handle starts to lift, the scale can be read.
4. If the spring is over or not up to weight, adjust by means of the vice pin; generally six clicks (three revolutions) make a difference of about 1 lb.
5. Turning the vice pin upwards decreases the weight, and vice versa.
6. The tension of the fusee spring should always be kept as high as possible, consistent with maintaining the normal rate of fire of 500 rounds per minute.
Weighing the Recoiling Portions
1. Remove the fusee spring.
2. place the crank handle nearly vertical.
3. place loop of spring balance over the right end of the crank shaft and pull slowly to the rear. The weight should not exceed 4 lbs.